OpenSSH tunnels
I have been asked many times by co-workers and friends to help them in establishing SSH tunnels, so I decided to create a web page for them for a change, therefore this page will somewhat more detailed that a usual page on my selfish wiki.
Overview
Why do we need tunnels. Usually to bypass a firewall or connect to an application that is accepting connections only from the local host or secure otherwise unsecure connection. I will provide solutions for common problems here. Lets make some assumptions. You are running a Windows workstation (don't worry my Microsoft-free friends, you will have your share). We will be using PuTTY (download), but all other SSH clients have the same capabilities.
Generate authentication keys
We will use Public Key Authentication method. You have to use SSH protocol verison 2 to utilize this capability. Using this method is more secure, then regular password authentication.
PuTTYgen
Putty comes with PuTTYgen, a program for authentication key manipulation. It has a lot of options, but we are going to utilize some simple one.
Start/Programs/PuTTY/PuTTYgen
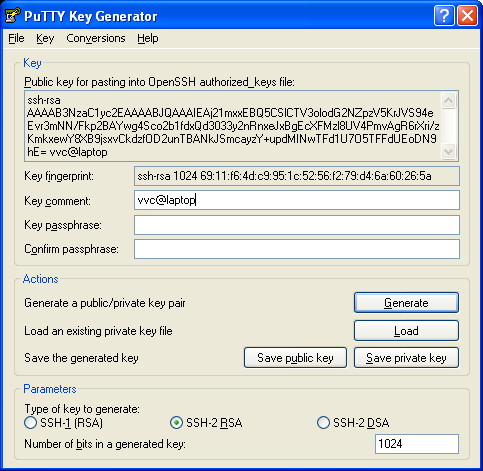
I suggest you keep the default settings and use SSH-2 RSA type of the key. If you want, you can increase the size of your key to 2048 bits. This key is used during authentication phase of establishing a connection. After the connection has been established, it is no longer needed for that session.
Press Generate button. Move your mouse while the program generates the key, it will help it to collect some random data which will make your key less predictable.
You will want to change the Key comment field to identify the key later. Setting a passphrase will provide a little extra security, as you will be prompted to provide it every time you use the key. I personally prefer to encrypt the saved key using standard Windows feature instead.
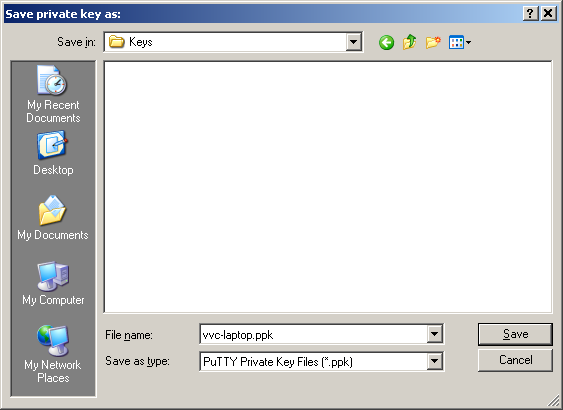
Press Save private key and save it in some folder, I will put it into My Documents/Keys directory I created.
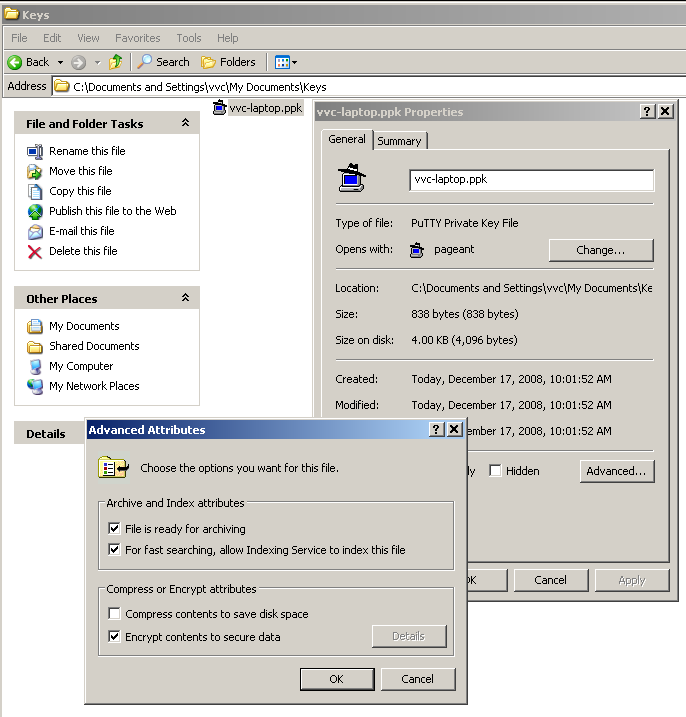
Lets not forget to encrypt the key. Right click on the file/Properties/Advanced/Encrypt
"Save public key" button would save public key in a format that is not compatible with OpenSSH, so we will not address it here. Instead have you noticed on top of the screen the following panel:
Copy this line and paste it in Notepad editor and save this public key for future use. And yes, even though it looks like several lines it's actually one line of text which will be even longer if you increased the size of the key.
Technically, you don't have to save it, because public key can be always generated from the private key, not other way around. If you run PuTTYgen again and in File menu select Load private key you will get access to the public key again.
ssh-keygen
ssh-keygen does all what PuTTYgen does with one simple (well...terse anyway) command and that's why we like Unix
[vvc@vps1 ~]$ ssh-keygen -t rsa -b 1024 -C 'vvc@vps1' -N '' -f ~/.ssh/vvc-vps1-rsa
Generating public/private rsa key pair.
Your identification has been saved in /home/vvc/.ssh/vvc-vps1-rsa.
Your public key has been saved in /home/vvc/.ssh/vvc-vps1-rsa.pub.
The key fingerprint is:
66:63:4f:61:d7:de:dc:cd:18:6d:68:6a:47:bb:11:54 vvc@vps1
This command generates an rsa key 1024 bits long with comment vvc@vps1 without password (if you can't trust your root who on Earth can you trust) and saves it in the file ~/.ssh/vvc-vps1-rsa. The public key was also saved in a file of the same name with a .pub extension. Not all of these parameters are necessary. Furthermore, since we are not using default name for private rsa key file (which is id_rsa, by the way) we would have to specify which key to use for our future connections, but I think we can manage that, especially since we will use openssh config file.
Install authentication key
First you have to be sure you have proper directory structure in place with secure permissions set, otherwise openssh server will refuse to use public key for authentication. This has to be done on the server we would like to connect using our private key.
chmod go-w $HOME
mkdir $HOME/.ssh
chmod 700 $HOME/.ssh
touch $HOME/.ssh/authorized_keys
chmod 600 $HOME/.ssh/authorized_keys
Now using you favorite editor add content of your public key to the $HOME/.ssh/authorized_keys so it will look like this:
[vvc@vps1 ~]$ cat /home/vvc/.ssh/authorized_keys
ssh-rsa AAAAB3Nza....DN9hE= vvc@laptop
I omitted most of the symbols to emphasize this is ONE line of text. You can have many keys stored in this file, each on separate line. Since I will be connecting from my laptop to vps1 I added public key generated on my laptop to the authorized_keys file on vps1. If I want to connect from vps1 server to xen server I would put public key generated on vps1 to authorized_keys file on xen server.
Now since the file is in place we are going to use it in PuTTY
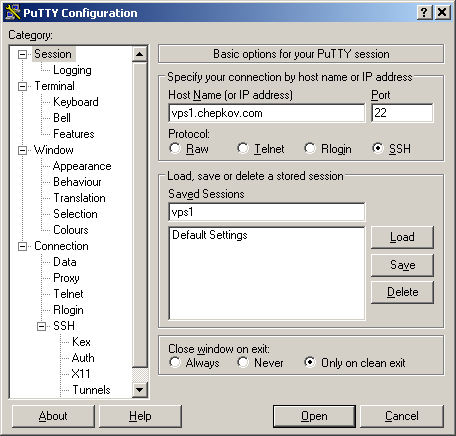
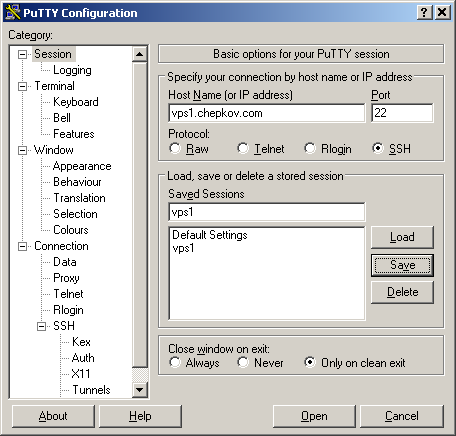
- Fill in hostname, port number, session name
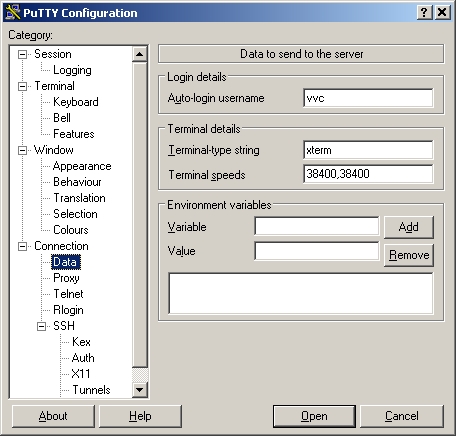
- Fill in your login name
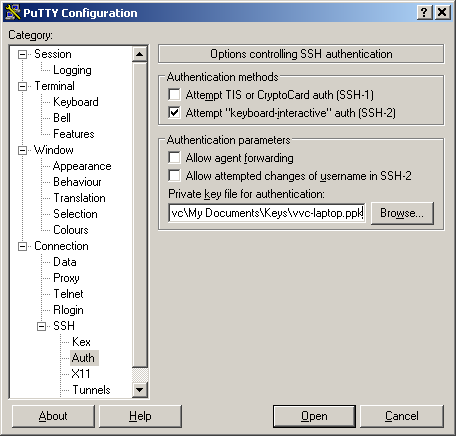
- Select your private key
- Return back to the session screen and hit on Save button to save you changes.
Remember, PuTTY as of yet doesn't have "Autosave" capabilities so you have to go back to Session screen and save changes you made. This is an important step to keep in mind while adding tunnels as nothing prompts you to save so people usually forget.
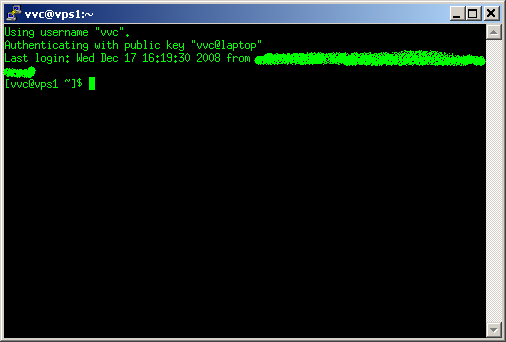
- Hit Open button.
Congratulations, you have established connection using your private key.
Tunnel to POP3 server using PuTTY
In this example we would like to connect to a remote POP3 server running on vps1 server. If you check it is listening only on localhost:
[vvc@vps1 ~]$ grep -w pop3 /etc/services |grep tcp
pop3            110/tcp         pop-3           # POP version 3
[vvc@vps1 ~]$ netstat -an|grep -w 110
tcp        0      0 127.0.0.1:110               0.0.0.0:*                   LISTEN
So, the only way to connect to it remotely is via tunnel. Lets add it:
- Start PuTTY
- Select vps1 session previously saved
- Click on Load button
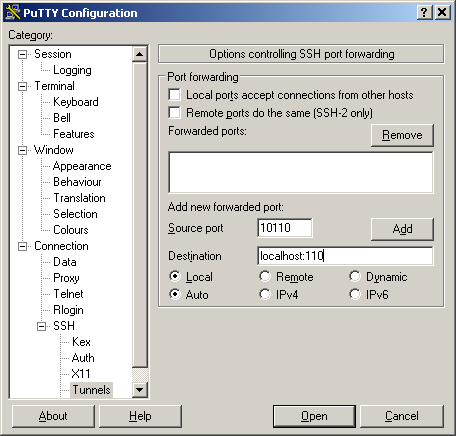
- Add the tunnel
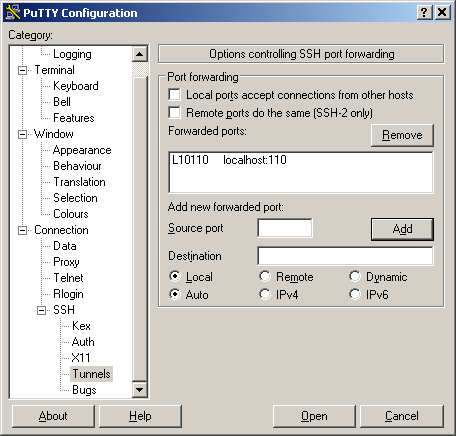
Ok, lets review the purpose. You want to forward Local port 10110 to "localhost port 110" on remote server. So, localhost here is direction for vps1 openssh server, not for the PuTTY. After you open your regular connection via ssh port 22, PuTTY will establish a tunnel "inside" of this connection. So for some third party observer or firewall it will be just packets going out to vps1 ports 22, nothing else. I have selected an arbitrary port on my laptop, 10110, I can use any port I want as long as it is not occupied by some other application.
- Click Add button
- Don't forget to save your changes
- Click on open button and establish connection with a tunnel.
You HAVE to keep ssh connection open for tunnel to be functioning.
Lets check if the tunnel works:
C:\Documents and Settings\vvc>telnet localhost 10110
+OK Dovecot ready.
quit
+OK Logging out
Connection to host lost.
Here we go, we were able to access remote POP3 server, Dovecot in this case. So if I had to configure a mail client program I would put server name as localhost and port as 10110 and I would have to start ssh session before I check my mail.
Tunnel to MySQL server using openssh
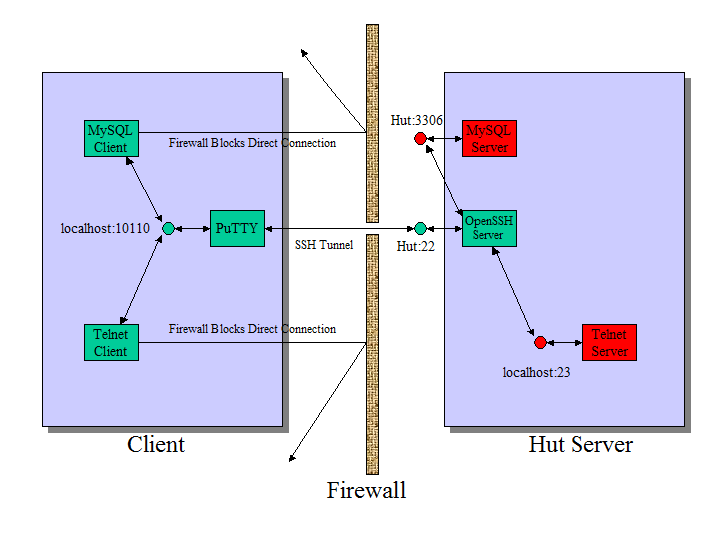
Now we want to connect from vps1 to mysql server running on server hut
- First I add my public generated key we generated earlier to authorized_keys file on server hut
[vvc@hut ~]$ cat vvc-vps1-rsa.pub >> ~/.ssh/authorized_keys
- Mysql is running on the hut, but even though it listens on external interface, connection to it blocked by firewall.
[vvc@hut ~]$ grep -w mysql /etc/services |grep tcp
mysql           3306/tcp                        # MySQL
[vvc@hut ~]$ netstat -an|grep -w 3306
tcp        0      0 0.0.0.0:3306                0.0.0.0:*                   LISTEN
- Next I create a section in $HOME/.ssh/config file on vps1
Host hut
Hostname vvc.homeunix.net
Port 22
User vvc
IdentityFile ~/.ssh/vvc-vps1-rsa
UserKnownHostsFile ~/.ssh/hut
LocalForward 10001 localhost:3306
- Establish connection
[vvc@vps1 ~]$ ssh hut
Last login: Wed Dec 17 12:50:13 2008 from vps1.chepkov.com
[vvc@hut ~]$
- Now in another open session with vps1 you can access mysql server running on hut:
[vvc@vps1 ~]$ mysql --host=127.0.0.1 --port=10001 -p vvcg2
Enter password:
Reading table information for completion of table and column names
You can turn off this feature to get a quicker startup with -A

Welcome to the MySQL monitor.  Commands end with ; or \g.
Your MySQL connection id is 131
Server version: 5.0.67 Source distribution

Type 'help;' or '\h' for help. Type '\c' to clear the buffer.

mysql>
Noticed the version on the server? it's 5.0.67 The client is 5.0.45, so we really connected to some other server:
[vvc@vps1 ~]$ mysql --version
mysql  Ver 14.12 Distrib 5.0.45, for redhat-linux-gnu (x86_64) using readline 5.0
Also noticed I specified 127.0.0.1 instead of localhost? That's because mysql client thinks it's smart and when it sees localhost as a hostname it tries to connect via UNIX socket and ignores --port parameter completely and silently.
Double tunnel to Postgres server (long way)
Here is our task. We want to connect to postgres port on server xen which is available only from server xen itself. The pickle is, xen's ssh server is running on port 2222 and our outgoing firewall doesn't allow such connections from laptop. What we have to do is to hop via vps1 to xen.
- First you would establish tunnel from you local port 5432 to vps1 port 15432 using previous example
- Second you establish tunnel from local port 15432 to xen port 5432 using previous example
- Now you can connect to local port 5432 using your favorit postgres client and it will connects you to postregs server of your dream.
Double tunnel to Postgres server (simplified)
- Generate a new key which we use for this "doubled" connection the way it described in previous example. It will be clear why we need another key later. It will have postgres@laptop comment in it.
- Create a PuTTY session with name xen-postgres but vps1 as a hostname, we connect to it first, after all. We set it to use new private key and a tunnel from local port 5432 to 'localhost:15432'
- Configure ssh access from vps1 to xen as described earlier, but forwarding local port 15432 to port 5432 on xen. Verify that ssh xen command will connect you from vps1 to xen.
- Add newly generated public key into your authorized_keys file, but with a twist: prefix it with command you want to execute after connection is established:
command="/usr/bin/ssh xen" ssh-rsa ABC....KK= postgres@laptop
- Now open the connection, you will end up on xen server right away and you will have all tunnels in place.
Reverse tunnel for firefox
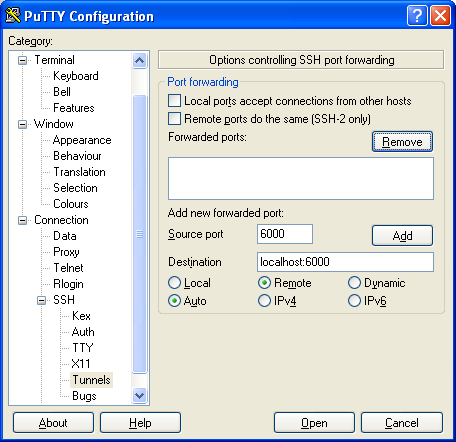
Now we want a remote X application (firefox, for instance) to be able to connect to locally running Cygwin X server. X Server by default is listening on port 6000, so to accomplish the task we need to forward remote localhost:6000 (we assume X Server is not running on remote server, it's a server after all, otherwise you have to choose a different port) to local port 6000.
Save you settings, establish the connection, start your firefox:
$ firefox --display localhost:0
Cheers!

